How to carve a straight spindle or post for your dollhouse furniture
Carving and turning is really quite easy and can be done while you are on those endless phone calls or watching television. If you own or have access to a small wood-turning lathe and know how to use it, you may find that you do not need the following instructions; but, if you are among the many who are approaching this aspect of miniature craftsmanship for the first time, read on.
This is how to make a spindle. This piece is rather bulky and perfect for a first-time carving. When you become proficient, you will be able to design your own shapes and do the most delicate spindle, leg, or finial.
Figure 1-C-3-a-1 shows a square stick of wood with the pattern drawn on the wood. Draw this design on all four sides of the piece of wood.
Figure 1-C-3-a-2 shows the placement of saw cuts (use a fine hobby hand saw such as "X-Acto" or "Snap" saw); the silhouette of one side of Figure 1-C-3-a-1 shows the depth of the saw cuts. These cuts aid in carving and help prevent chipping. Remember, you can always make a deeper cut later, but you cannot erase a cut that is too deep.
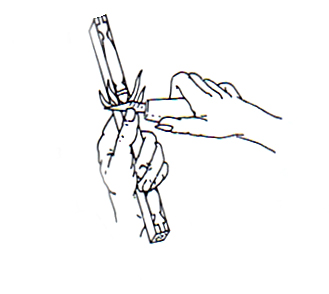
Figure 1-C-3-a-3 shows the placement of pencil lines to be drawn at the high point of each segment to be shaped. Mark these on the wood. Figure 1-C-3-a-4 shows how you would hold the wood to carve it. You will want to use a hobby knife such as "X-Acto" or "Stanley" for the carving. Both of these knives are very good and have a variety of blades from which to choose.
You will "shave" the area away, turning the wood as you carve. You may use a variety of small files to achieve part of the shaping, remembering to keep turning the wood around as you work. This assures a continuous balance in the cylindrical shaping.
Draw the knife or file down in a rounding motion from the pencil high-point to the saw cut. Continue in this manner until the segment is shaped as it is in Figure 1-C-3-a-5, to the depth of the saw cut. When the entire piece has been shaped in this manner, sand carefully. You can use emery boards for part of this sanding as they are firmer than just a piece of sandpaper. Be careful, for the original strength of the wood has been weakened by the carving.
If the spindle or post should break, you can repair it. Carefully and gently drill into each broken end of the post (a tiny pin drill that is operated by hand is best for this purpose) and place and glue a wooden dowel or peg or small brad (with the head removed) into the hole; then push and glue the second portion of the broken post over the other end of the peg. The two pieces are joined together. Let them dry.
Note: Stain these pieces of wood before gluing, as the glue does not allow the stain to penetrate the wood.
Have a great day...


Comments
Post a Comment