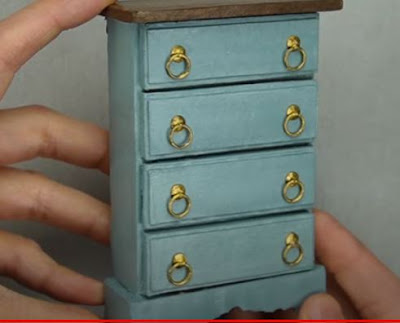
Crafting Magic: Create an Easy Dollhouse Miniature Dresser from Cardboard
Dollhouse enthusiasts and craft lovers, get ready to embark on a delightful journey of creativity! In this blog post, we'll guide you through the simple and magical process of crafting a miniature dresser for your dollhouse using the versatile and budget-friendly material – cardboard. This project is not only easy but also allows you to add a personalized touch to your miniature world.
Materials Needed:
1. Cardboard sheets
2. Craft knife or scissors
3. Ruler
4. Pencil
5. Acrylic paint or colored paper
6. Glue
7. Paintbrush (if using paint)
8. Decorative elements (optional)
Step-by-Step Guide:
1.Design Your Dresser:
Begin by sketching the design of your miniature dresser on a piece of cardboard. Keep it simple to ensure an easy crafting process. You can create drawers, handles, and any additional details you desire.
2. Cutting the Cardboard:
Using a craft knife or scissors, carefully cut out the dresser pieces according to your design. Ensure precision, as this will determine the final look of your miniature furniture.
3. Assembling the Dresser:
Lay out the cut pieces and assemble them to form the basic structure of the dresser. Use glue to secure the edges and ensure the pieces stick together seamlessly.
4. Adding Details:
Enhance the visual appeal of your dresser by adding details such as drawer handles, knobs, or decorative elements. You can cut smaller pieces of cardboard to create these features or use other materials like beads or buttons for a unique touch.
5. Painting or Decorating:
Now comes the fun part – painting or decorating your dresser! Choose colors that complement your dollhouse's overall theme. Alternatively, you can cover the dresser with colored paper or fabric for a different texture.
6. Allowing for Drying:
If you've opted for paint, allow the dresser to dry completely before handling it further. This step ensures a polished and professional finish to your miniature creation.
7. Personalizing Your Dresser:
This is the stage where you can let your imagination run wild. Add personal touches such as decals, tiny stickers, or miniature fabric for a touch of elegance.
8. Final Touches:
Once everything is dry and set, your miniature dresser is ready to become a charming addition to your dollhouse. Place it in the bedroom, living room, or any other space where you envision it fitting seamlessly into the miniature world you've created.
Crafting a dollhouse miniature dresser from cardboard is not only easy but also incredibly rewarding. It allows you to unleash your creativity and personalize your dollhouse with a handmade touch. So, gather your materials, dive into this DIY project, and watch as your miniature world comes to life with a touch of ingenuity and a dash of magic!
Thanks for stopping by today!


Comments
Post a Comment