
Creating Elegant Miniature Glass & Silver Kitchen Decanters and Carafes for Your Dollhouse
Dollhouse enthusiasts know that it’s the fine details that bring miniatures to life. Crafting miniature glass and silver kitchen decanters or carafes adds a touch of sophistication to any dollhouse kitchen or dining room. While these tiny pieces may be a bit fiddly to assemble, the results are well worth the effort, giving your dollhouse a look of elegance. Today, we’ll walk through how to make these charming miniatures using everyday crafting materials.
Materials You'll Need:
To get started, you'll need a variety of supplies, many of which can be found at craft stores or repurposed from household items:
1. Reusable Hard Plastic Drinking Straws:
- Outer Diameter: 8 mm, Inner Diameter: 6 mm
- These will serve as the body of your carafe. Their transparency mimics glass beautifully!
2. Faceted Glass Crystal Beads (10 mm):
- These beads act as the body or base of your decanter, adding a glassy shine to the miniature.
3. Silver Colored Jewelry Tubes:
- Use these to create the neck of the carafe, giving it a sleek, metallic look.
4. Double-Sided Bead Caps & Metal Bead Caps:
- These caps create decorative bases or neck accents for your decanters and pitchers.
5. Large Sequin or Plastic Card for Base:
- A sequin or a small cut-out from a card can be used as the flat bottom of your decanter, making it stable.
6. Craft/Jewelry Wire (15 Gauge, 1.5 mm):
- This will be bent into handles for the pitchers.
7. Glue Options:
- Glue 'n' Glaze or Aleene’s Fast Grab Tacky Glue works for general bonding.
- Superglue can be handy for attaching smaller pieces like handles.
8. Pebeo Cerne Relief Transparent Relief Outliner:
- This dries clear and can be used to add texture or dimensional detailing to the decanter.
9. Chrome Marker Paint Pen:
- Gives the silver metallic shine to parts like the neck or handle of the decanter.
10. Optional: Ranger Glossy Accents:
- This clear dimensional medium adds extra thickness and shine to the glass parts.
11. Tools:
- Round Nose Pliers, Wire Bending Pliers, and Flat Nose Pliers (for precision work on the handles).
- Ball Stylus or Dotting Tools to shape delicate details.
- Craft Knife, Scissors, and Hot Glue Gun for cutting and assembling pieces.
12. Finishing Tools:
- Sandpaper for smoothing rough edges.
- Paintbrush to apply glue or paint details.
---
Step-by-Step Instructions:
1. Creating the Body of the Carafe:
- Cut the plastic drinking straw to the desired height of your carafe. Aim for a height of 1-1.5 inches (2.5-3.8 cm) for a realistic miniature scale.
- Attach a 10 mm faceted glass bead to the bottom of the straw using glue. This will form the rounded glass base of the carafe.
- Once the bead is securely in place, use the Pebeo Cerne Relief to apply transparent detailing, if you want extra texture or lines to mimic glass-blown designs.
2. Building the Neck:
- Take a silver-colored jewelry tube and trim it to fit the top of your straw carafe. This tube will act as the neck of the decanter. Use your chrome marker pen to add any metallic details that will make it stand out.
- Secure the tube with glue. Ensure the alignment is perfect so the decanter looks seamless.
3. Adding Decorative Caps:
- Use double-sided bead caps for both the base and the top part of your carafe. Glue them securely at the bottom and top to give a fancy, decorative touch. You can also use a large sequin or a small plastic card as a stabilizing base beneath the bead to ensure it stands upright.
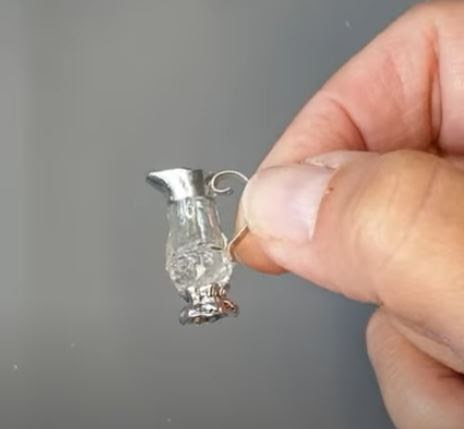
4. Crafting Handles (For Pitchers):
- Cut a short piece of the 15-gauge jewelry wire, and bend it into a smooth, rounded shape using round nose pliers. This will be your handle.
- Attach the handle to the neck of the carafe using superglue. For added security, you can also add a dab of tacky glue to reinforce the bond.
5. Finishing Touches:
- If you wish to add a bit more thickness or shine to the “glass” parts, apply a thin layer of Ranger Glossy Accents to the body of the decanter. It will dry clear and give it a more dimensional, realistic look.
- Once everything is dry, use sandpaper to smooth any rough edges, especially around where the bead caps are glued.
- You can even use a paintbrush to apply additional chrome or metallic details around the neck or base, depending on the style you want.
---
Making miniature kitchenware for your dollhouse can be a creative and rewarding process. These miniature glass and silver decanters or carafes bring a refined elegance to any dollhouse scene, whether displayed on a kitchen shelf or as part of a table setting. They’re fairly simple to make once you gather the right materials, though a steady hand and patience are essential due to the small size of the components.
Experiment with different shapes, bead designs, and wire styles to create a whole collection of unique kitchen accessories! Let your imagination guide you, and enjoy the process of bringing your miniatures to life.
Happy crafting!
Thanks for stopping by today!


Comments
Post a Comment